*To determine which Adjustable E-Z Mount Fender Bracket you will need (4" 8" or 10")
Use a capenters square and a tape measure:
Measure from the center of the bolt hole in the frame (straight up and down) to the bottom of the fender.
- If the measurement is 0-4"
- you will need a 4" bracket.
- If the measurement is 4-8"
- you will need a 8" bracket.
- If the measurement is 8-10"
- you will need a 10" bracket.
NOTE: You can mount the 4"Adjustable E-Z Mount Bracket at any angle. (360 degrees)
Do not mount the 8" or 10" Adjustable E-Z Mount Brackets at an angle greater than 45 degrees. If you are mounting either bracket at an angle greater than 45 degrees, YOU MUST USE the next size shorter bracket.
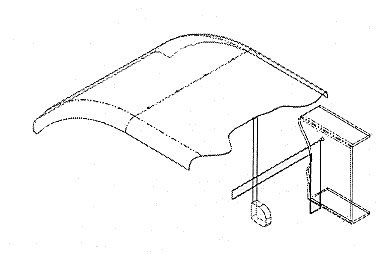
Park truck on flat surface and set brake. Let air out of bags and make sure that the suspension is at its lowest position. Determine the best location for your fenders to be mounted and temporarily block or support fender into desired position. These are universal brackets and are designed to utilize the fifth-wheel assembly rail hole, or can be plugged into any existing bolt hole in the frame by enlarging the hole to 5/8". The bracket rotates upward or outward to meet your fender in a relaxed position.
DO NOT FORCE THE FENDER DOWN OR IN TO MEET THE BRACKET.
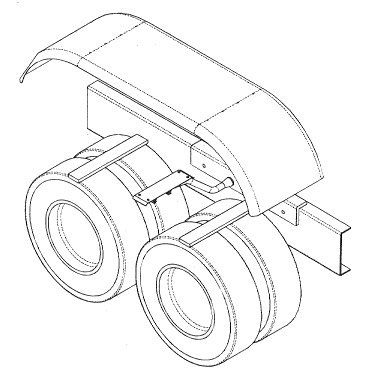
For the front or rear mounting brackets on full tandem fenders,
or the front mounting brackets
on half tandem fenders, use either a 4" Adjustable Fender Mount or an Outside Fender Mount only.
Again, the 4" Adjustable Fender Bracket can be mounted at any angle. The 8" and 10" center support brackets should not be mounted at an angle greater than 45 degrees.
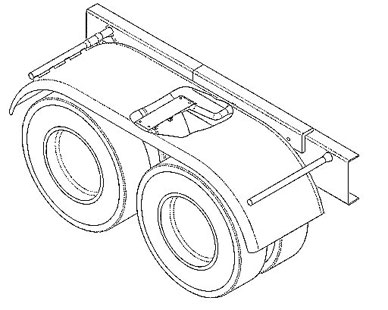
Determine if one of the fifth wheel rail holes may be used or if any mounting holes need to be drilled into the frame. (Follow the manufacturers recommended procedure for drilling holes in the Frame)
Remember: * The Adjustable Fender Bracket Arm should be mounted 9 to 15 inches from the bottom end of the fender. * The Outside Fender Bracket should be mounted 12 to 16 inches from the bottom edge of the fender.
|
 |
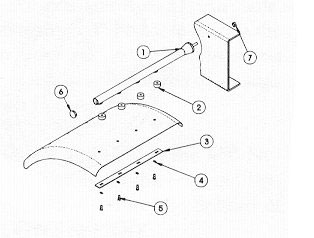
PRE-ASSEMBLY INSTRUCTION
|
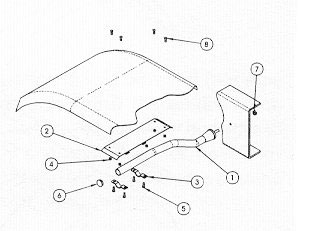
Adjustable Mount Bracket
1. 1 29" x 1 5/8" ROUND BRACKET W/BOLT
2. 1 5" x 18" FLAT PLATE W/CLAMPS
3. 2 1" x 4 l/2" CLAMPS
4. 8 3/8" - 16 NYLOC NUTS
5. 4 3/8" x 1 1/4" HEX BOLT
6. 1 1 1/2" PLASTIC END CAP
7. 1 5/8" - 18 NYLOC NUT
8. 4 3/8" x 1" STAINLESS CAP BOLTS
NOTE: Assemble flat plate so clamps are
towards outside end of bracket.
|
|
Single Stud Mount Bracket
1. 1 29" x 1 5/8" ROUND BRACKET W/BOLT
2. 4 1 1/2" x 3/4" RUBBER SPACERS
3. 1 1 1/2" X 19 3/4" BACKING PLATE
4. 4 3/8" TAB LOCKWASHERS
5. 4 1 3/4 X 3/8" HEX BOLT
6. 1 1 1/2" PLASTIC END CAP
7. 1 5/8" - 18 NYLOC NUT
|
|
Post Mount Bracket
1. 1 25.5" x 1 5/8" ROUND BRACKET
2. 4 1 1/2" x 3/4" RUBBER SPACERS
3. 1 1 1/2" X 19 3/4" BACKING PLATE
4. 4 3/8" TAB LOCKWASHERS
5. 4 1 3/4" X 3/8" HEX BOLT
6. 1 1 1/2" PLASTIC END CAP
7. 1 1/2" - 13 NYLOC NUT
8. 1 1/2" - 13 X 2 1/4" HEX BOLT
9. 1 BRACKET CLAMP
|
|