*Review HOW TO USE E-Z MOUNT BRACKET SYSTEM and pre-assemble your brackets.
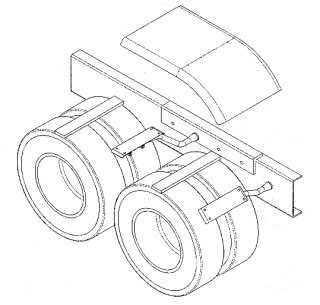
Determine the best location for your fenders to be mounted and temporarily block or support the fender into desired position. (we suggest using a 1 x 4 x 12" strip of wood across the top of tires.) Using shims where necessary, center the fender on the blocks, making sure the fender is level with the frame. (NOTE: check to ensure there is adequate room under the fender to mount the front bracket.)
(NOTE: It is important to keep the fender an equal distance from the frame. Periodically check the distance, front and rear, by measuring from the outside edge of the fender to the frame.)
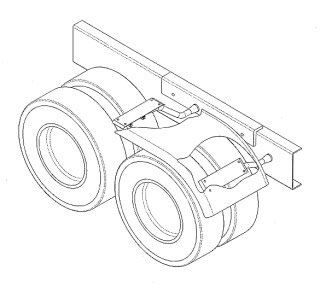
It is helpful to install your center support (rear) bracket first on half-fenders. Place the E-Z Mount Center Support Bracket into the predetermined frame hole. (NOTE: If possible utilize the fifth wheel rail hole.) Rotate the bracket in an upward position or slightly toward rear of fender. (NOTE: If you are using a 8" or 10" bracket do not mount bracket at an angle greater than 45 degrees. If you are mounting either bracket at an angle greater than 45 degrees, YOU MUST USE the next size shorter bracket.) Do not drill fender holes yet - use a vice grip type clamp to hold the fender.
Using a 4" E-Z Mount Bracket under the fender, in the front of the tire, install the assembled bracket into the predetermined hole in the frame. Tighten the Nyloc nut so the bracket rotates firmly forward, up or down. It is best to mount the bracket arm in a range of 9" to 13" from the bottom edge of the fender to the center of the bracket arm. Allow the bracket plate to meet the fender evenly. (NOTE: Do not force the fender down or in to meet the bracket.)
Adjust bracket plate in or out across the width of the fender so it is centered (you want all holes in fender to be in line when you are finished.) Mark and drill the fender holes, removing the fender before drilling. Reset the fender and install stainless buttonhead bolts
through fender and bracket plate tightening only one Nyloc nut for now. Proceed to center support (rear) bracket.
Before drilling and bolting the center support (rear) bracket, adjust the bracket plate in or out across the width of the fender so it is centered. (NOTE: If you are using a 8" or 10"" bracket do not mount bracket at an angle greater than 45 degrees. If you are mounting either bracket at an angle greater than 45 degrees, YOU MUST USE the next size shorter bracket.) Drill the holes into the fender (fender does not need to be removed.) Install stainless buttonhead bolts through fender and bracket plate. When you have completed mounting center support (rear) bracket tighten all Nyloc nuts front and rear.
Torque 5/8" Nyloc nuts to 150 ft/lbs.
Replace the air in the suspension. Mounting is complete.
|
 |